Introduction
Learn how to efficiently restore an AWS Aurora cluster using the AWS Backup service in this comprehensive tutorial. Whether you’re testing backups or dealing with an unexpected outage, this guide will walk you through the process to ensure a seamless recovery experience.
Restoring the Aurora Cluster from AWS Backup
Begin by logging into the AWS console and accessing the Backup console.
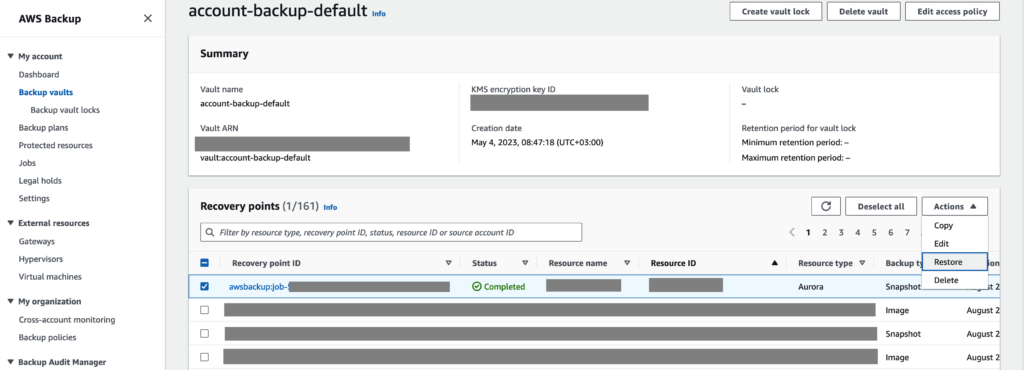
Inside the console, navigate to your vault and locate the backup of the Aurora cluster that you intend to restore. Select the backup by checking the checkbox, then click “Actions” and choose “Restore.”
Configuring the Restored Aurora Cluster
On the new page that loads, you’ll be presented with options to set up your restored Aurora cluster’s deployment. Many settings might already be preconfigured, simplifying the process. For additional clarity, refer to configurations in related AWS services such as VPC or RDS. If you have infrastructure as code or documentation for the original setup, consult these resources for guidance.
Adding a New Instance to the Restored Cluster using aws-cli
To add a new instance to the restored Aurora cluster, leverage the power of aws-cli. Utilize the following command structure:
aws rds create-db-instance \
  --profile <aws profile> \
  --region <aws region> \
  --db-instance-identifier <cluster-name>-0 \
  --db-cluster-identifier <cluster-name> \
  --engine <database engine> \
  --db-instance-class <instance size class>
Explanation of Command Options:
--profile <aws profile>: Specify the AWS profile if using an IAM user locally. If you are using a service like AWS SSO, then you will need to get your temporary credentials.--region <aws region>: Indicate the AWS region where the restored Aurora cluster resides.--db-instance-identifier <cluster-name>-0: Assign a name to the new database instance within the Aurora cluster.--db-cluster-identifier <cluster-name>: Define the target cluster where the new instance will be added.--engine <database engine>: Select the database engine in use, such asaurora-postgresqloraurora-mysql.--db-instance-class <instance size class>: Choose an instance size from the available list. You can find a list of instance sizes here. Some instance sizes will not work with Aurora, so try a different size if you receive an error.
Monitoring and Testing
Upon executing the command successfully, monitor the AWS console for the creation of the new instance. Once the instance is up and operational, retrieve the read/write endpoints from the restored cluster. Proceed to test your recovered database(s) using these endpoints.
Conclusion
By following these systematic steps, you can effectively restore an AWS Aurora cluster using AWS Backup. This tutorial provides you with a clear roadmap to recover from unforeseen incidents or to conduct testing with confidence. Ensure the resilience of your data infrastructure by mastering the art of cluster restoration with AWS services.
If you have any issues with the above or want to add some details on your restoration, feel free to comment below.
If this helped you out and you want to give some kudos, you can always buy me a cup of coffee:

References:


Leave a Reply